
Audience: Platform engineers, Kubernetes admins, SREs, dev ops engineers
Intro
This post is the first in a series on Cluster API Provider for Azure (CAPZ).
What is the cluster API Provider for Azure? To quote from the introductory post from the Azure team:

Managing Kubernetes clusters is hard.
Managing Kubernetes clusters at scale across a variety of infrastructures is—well—even harder.
The Kubernetes community project Cluster API (CAPI) enables users to manage fleets of clusters across multiple infrastructure providers. The Cluster API Provider for Azure (CAPZ) is the solution for users who need to manage Kubernetes clusters on Azure IaaS. In the past, we have recommended AKS Engine for this common scenario. While we will continue to provide regular, stable releases for AKS Engine, the Azure team is excited to share that CAPZ is now ready for users and will be our primary tool for enabling customers to operate self-managed Kubernetes clusters on Azure IaaS.
Background
I wasn’t familiar with the Kubernetes Cluster API project until I participated in a hackathon with a couple of folks from the Azure Kubernetes Service (AKS) team last year in October 2022. I lucked out by getting to work with Jack Francis who is an engineer working on CAPZ and co-authored the above blog post. I learned a great deal from Jack on that hack; that Cluster API (CAPI) is a means of representing Kubernetes clusters as Kubernetes custom resource definitions (CRDs). This in turn lets you use the declarative nature of Kubernetes manifests to simplify provisioning, upgrading, and operating multiple Kubernetes clusters. It is provider based, enabling different environments and clouds to be supported all through a unified set of CRDs.
CAPZ is the provider that brings Azure support to the Cluster API and the production version shipped in November 2021. It enables two primary classes of scenario: Firstly you get the ability to create managed clusters on AKS much like you can on other clouds via CAPI. The full list of supported providers / clouds can be found here. Secondly, CAPZ is the answer for Azure self-managed Kubernetes clusters for people who were previously using AKS Engine. For this use-case, CAPZ is the recommended solution for users who need to manage Kubernetes clusters on Azure IaaS as I learned from David Tesar, Product Manager for CAPZ.
Whilst there is an official quickstart for CAPZ I struggled to make it work back in October 2022 and the steps outlined here are what Jack showed me; they are specific to the contributing flow but work well for getting started simply. I plan on digging into the official quickstart in a subsequent post.
What we will cover
In this post I’m going to show how to get started from the CAPZ repo and:
- Run CAPZ from the official repo and using the
makefileto create a local management cluster on your devbox usingKind - Use the
Tilt-based GUI front end to manipulate the local management cluster and create an AKS cluster in Azure - How to query the management cluster from the cli using
kubectlto show the provisioning status of the AKS cluster in Azure - How to clean up
In subsequent posts, we’ll look at other tasks such as how to install CAPI / CAPZ into a pre-existing homelab cluster and perform further customizations and management tasks.
Prerequisites
To follow along I’m assuming you know the basics of Kubernetes and Linux administration. Tools you will need are:
- git cli: (install)
- docker: (install)
- make: (install)
- Azure CLI: (install)
- Tilt: (install)
- kind: (install)
Clone the CAPZ repo
First, we’ll grab CAPZ from the upstream repo: git clone https://github.com/kubernetes-sigs/cluster-api-provider-azure.git
Configure Azure subscription settings
Next change into the cluster-api-provider-azure directory and create placeholder file named tilt-settings.json in the root of the repository as shown below. For convenience you can grab one I made earlier with curl -o tilt-settings.json -L https://raw.githubusercontent.com/clarkezone/cluster-api-provider-azure/blogpost/tilt-settings-template.json
1
2
3
4
5
6
7
8
9
10
11
12
13
14
15
16
17
18
19
20
21
22
{
  "kustomize_substitutions": {
    "AZURE_SUBSCRIPTION_ID": "00000000-0000-0000-0000-000000000000",
    "AZURE_TENANT_ID": "00000000-0000-0000-0000-000000000000",
    "AZURE_CLIENT_SECRET": "AaA1A~1AaA1111AAAaaaaaAaaaaaa-A1A1aaaaAa",
    "AZURE_CLIENT_ID": "00000000-0000-0000-0000-000000000000",
    "AZURE_ENVIRONMENT": "AzurePublicCloud",
    "AZURE_SSH_PUBLIC_KEY_B64": ""
  },
  "worker-templates": {
    "flavors": {
      "default": {
        "WORKER_MACHINE_COUNT": "1",
        "KUBERNETES_VERSION": "v1.23.6",
        "AZURE_LOCATION": "westus2",
        "AZURE_NODE_MACHINE_TYPE": "Standard_D2s_v3",
        "CONTROL_PLANE_MACHINE_COUNT": "1"
      }
    },
    "metadata": {}
  }
}
Let’s fill in all the values we need to make things workwith your subscription. To do that we’ll login to Azure, query some properties and create a service principal that CAPZ will use for creating resources on your behalf:
Login via Azure CLI:
az login- Get subscription id and tenant id using az cli:
1
2
3
4
# subscription id
az account show --query id --output tsv
# tenant id
az account show --query homeTenantId --output tsv
- Create service principal passing in subscription id from above:
1
az ad sp create-for-rbac --role contributor --scopes="/subscriptions/<REPLACE-WITH-SUBSCRIPTION-ID-FIELD> --name=capztest"
- Update the
tilt-settings.jsonupdating- AZURE_SUBSCRIPTION_ID with subscription id
- AZURE_TENANT_ID with tenant id
- AZURE_CLIENT_SECRET with password from create-for-rbac
- AZURE_CLIENT_ID with appId from create-for-rbac
Here is a color coded mapping:![]()

Create the management cluster and fire up the management plane UI
The makefile has a handy dandy help command which you can get via make help to help get oriented. You’ll see a fairly extensive list of options that come out of the box. We’re going to focus on getting a local management cluster going.
- Create a
kindcluster. Note that whilst I’m explicitly having you do this and the next step, step 3 should theoretically take care of this automatically (thanks to Jack for pointing this out).1
make kind-create
If all goes well, the result of this command will be a bunch of terminal spew from
kindspinning up the management cluster containing the CAPZ install that will subsequently do the heavy lifting of creating AKS clusters for us on demand. If you check registered Kubernetes contexts withkubectl config get-contextsyou should see a context for kind-capz that has been selected as the current cluster. A quickkubectl get nodeswill confirm that all is ready.![]()
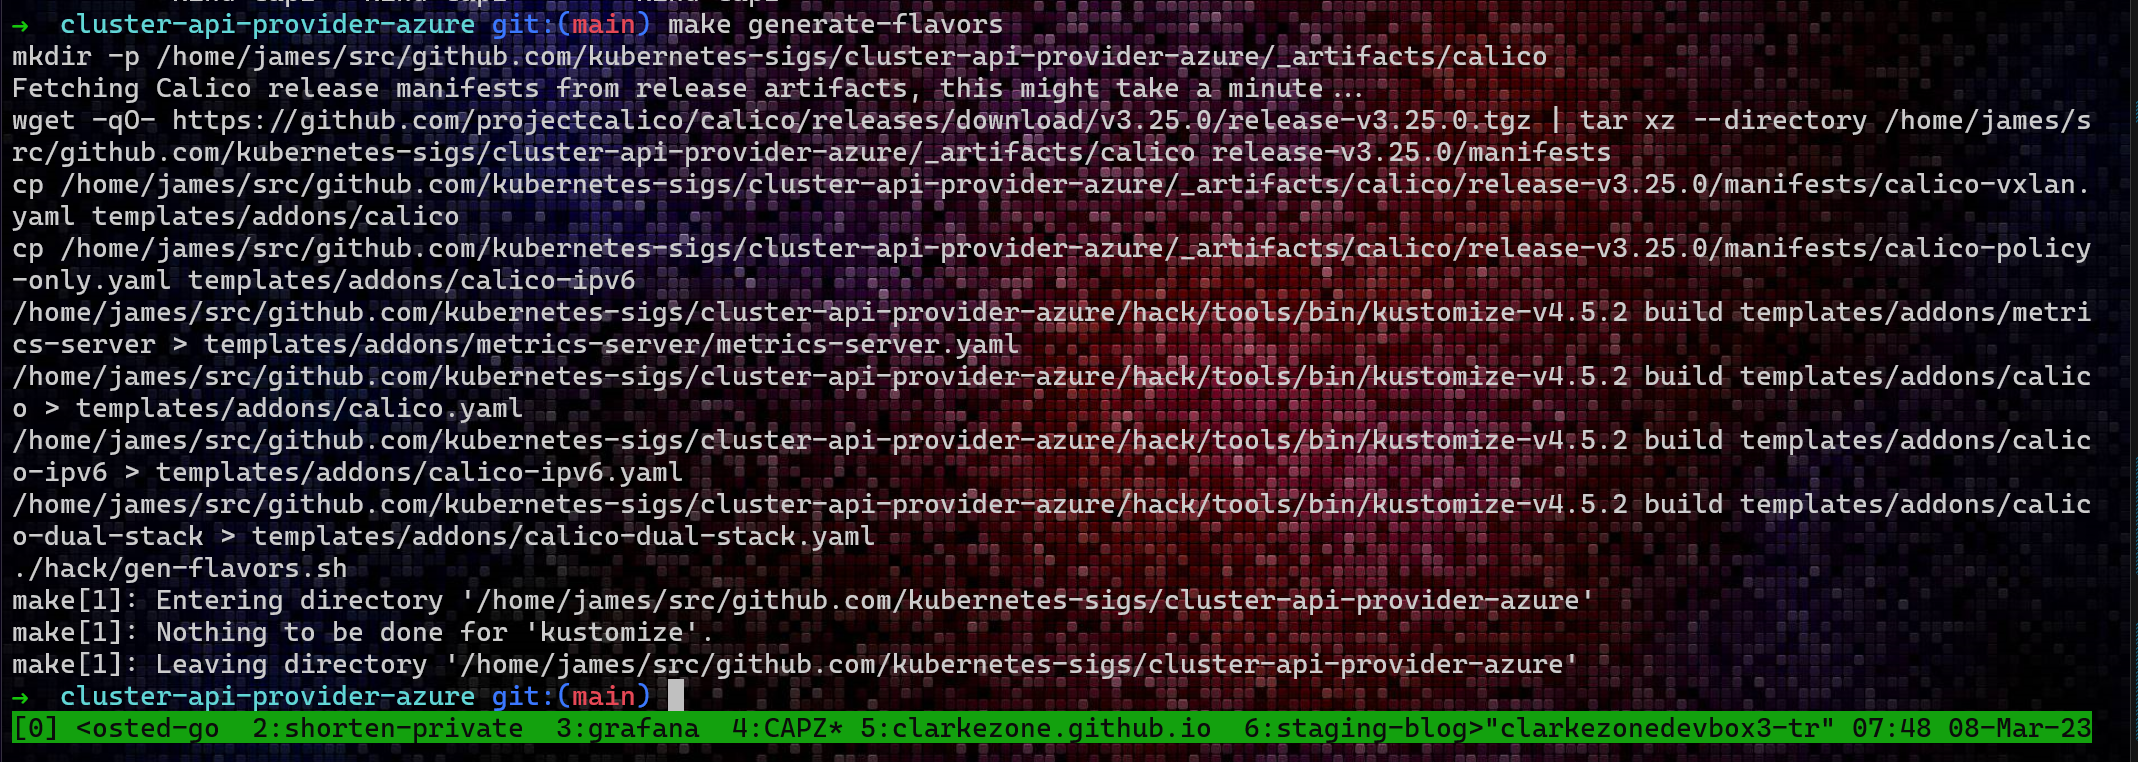
- Generate the machine templates This step is creating the list of templates that you’ll see in subsequent steps. The definitions for these are part of the CAPZ repo. In the next post in this series I’ll show how to add new templates and customize existing ones.
1
  make generate-flavors
This step can take quite a bit of time. The result is a bunch of under-the-covers template expansion which enables subsequent steps.
![]()
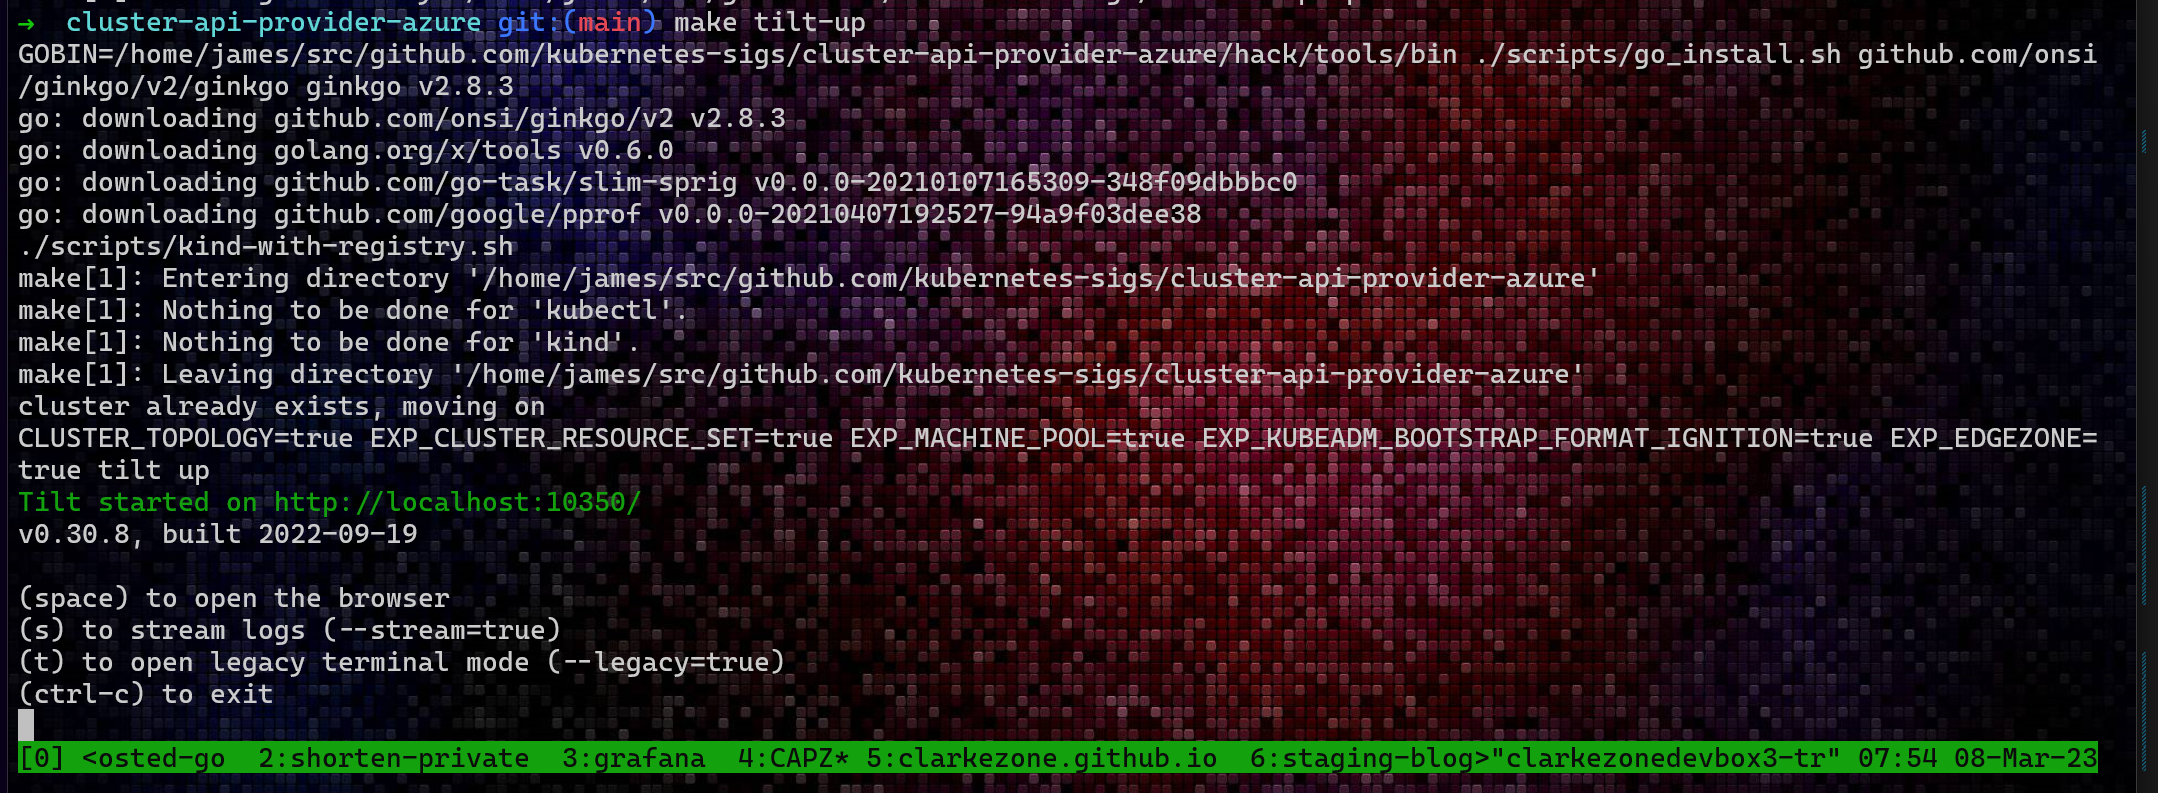
- Start tilt to enable GUI for creating clusters
1
  make tilt-up
This command starts a
tiltsession which you can connect to from your browser using the generated link. Tilt is a dev tool that is being used to provide a simple GUI in front of CAPZ which enables you to create various flavors via the browser.![]() It’s worth noting here that Tilt is incidental to CAPZ and is provided for convenience and testing purposes. There is no hard dependency here, if you follow the instructions for installing CAPZ into your own “pilot” cluster, you won’t end up with a tilt instance at all. It is kind of cool.
It’s worth noting here that Tilt is incidental to CAPZ and is provided for convenience and testing purposes. There is no hard dependency here, if you follow the instructions for installing CAPZ into your own “pilot” cluster, you won’t end up with a tilt instance at all. It is kind of cool.

Deploy vanilla AKS cluster into your Azure subscription
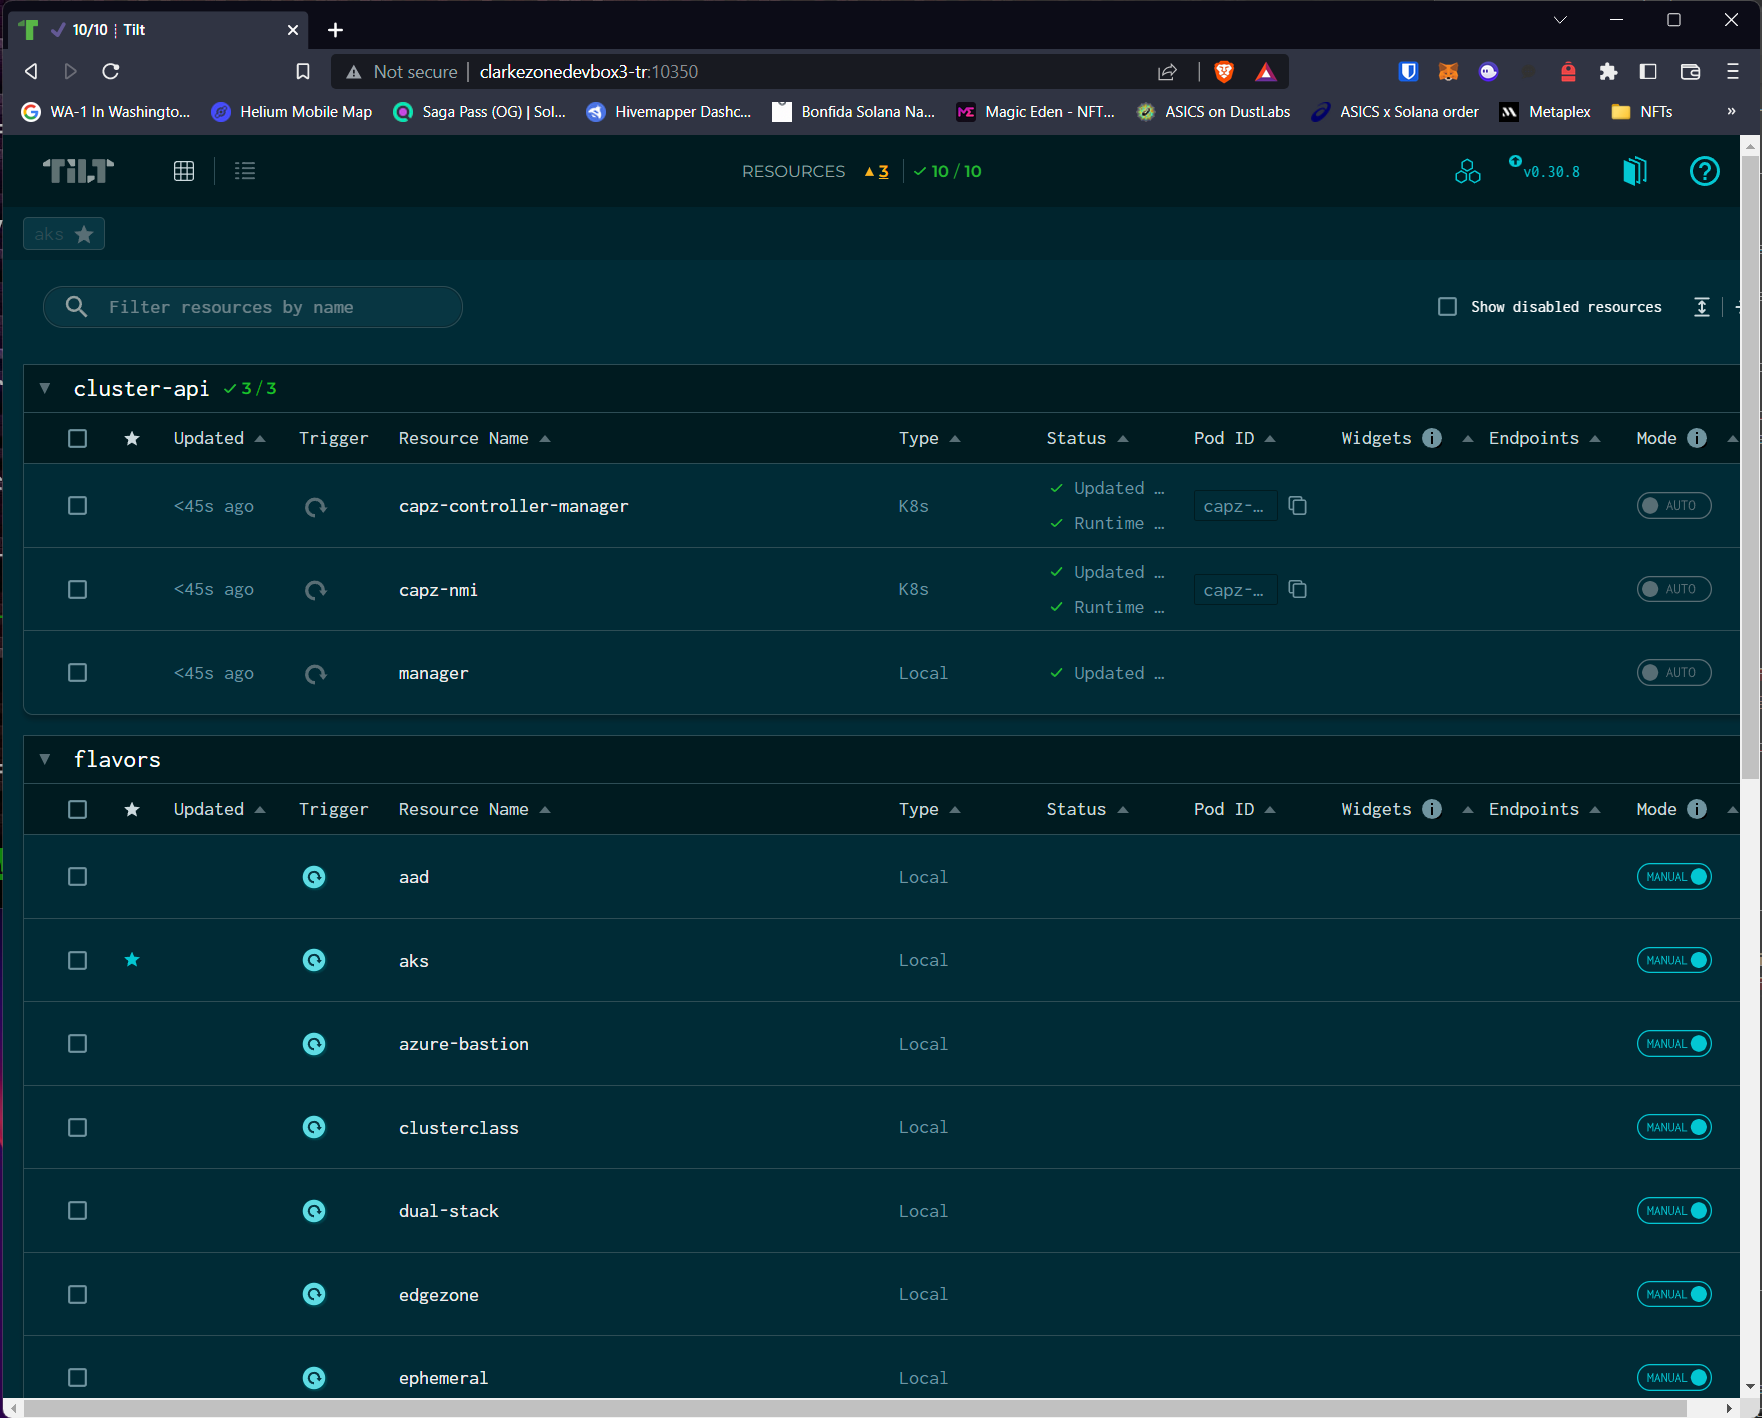
- Open a browser and navigate to the tilt web server that you just started above. In my case this is
localhost:10350![]()
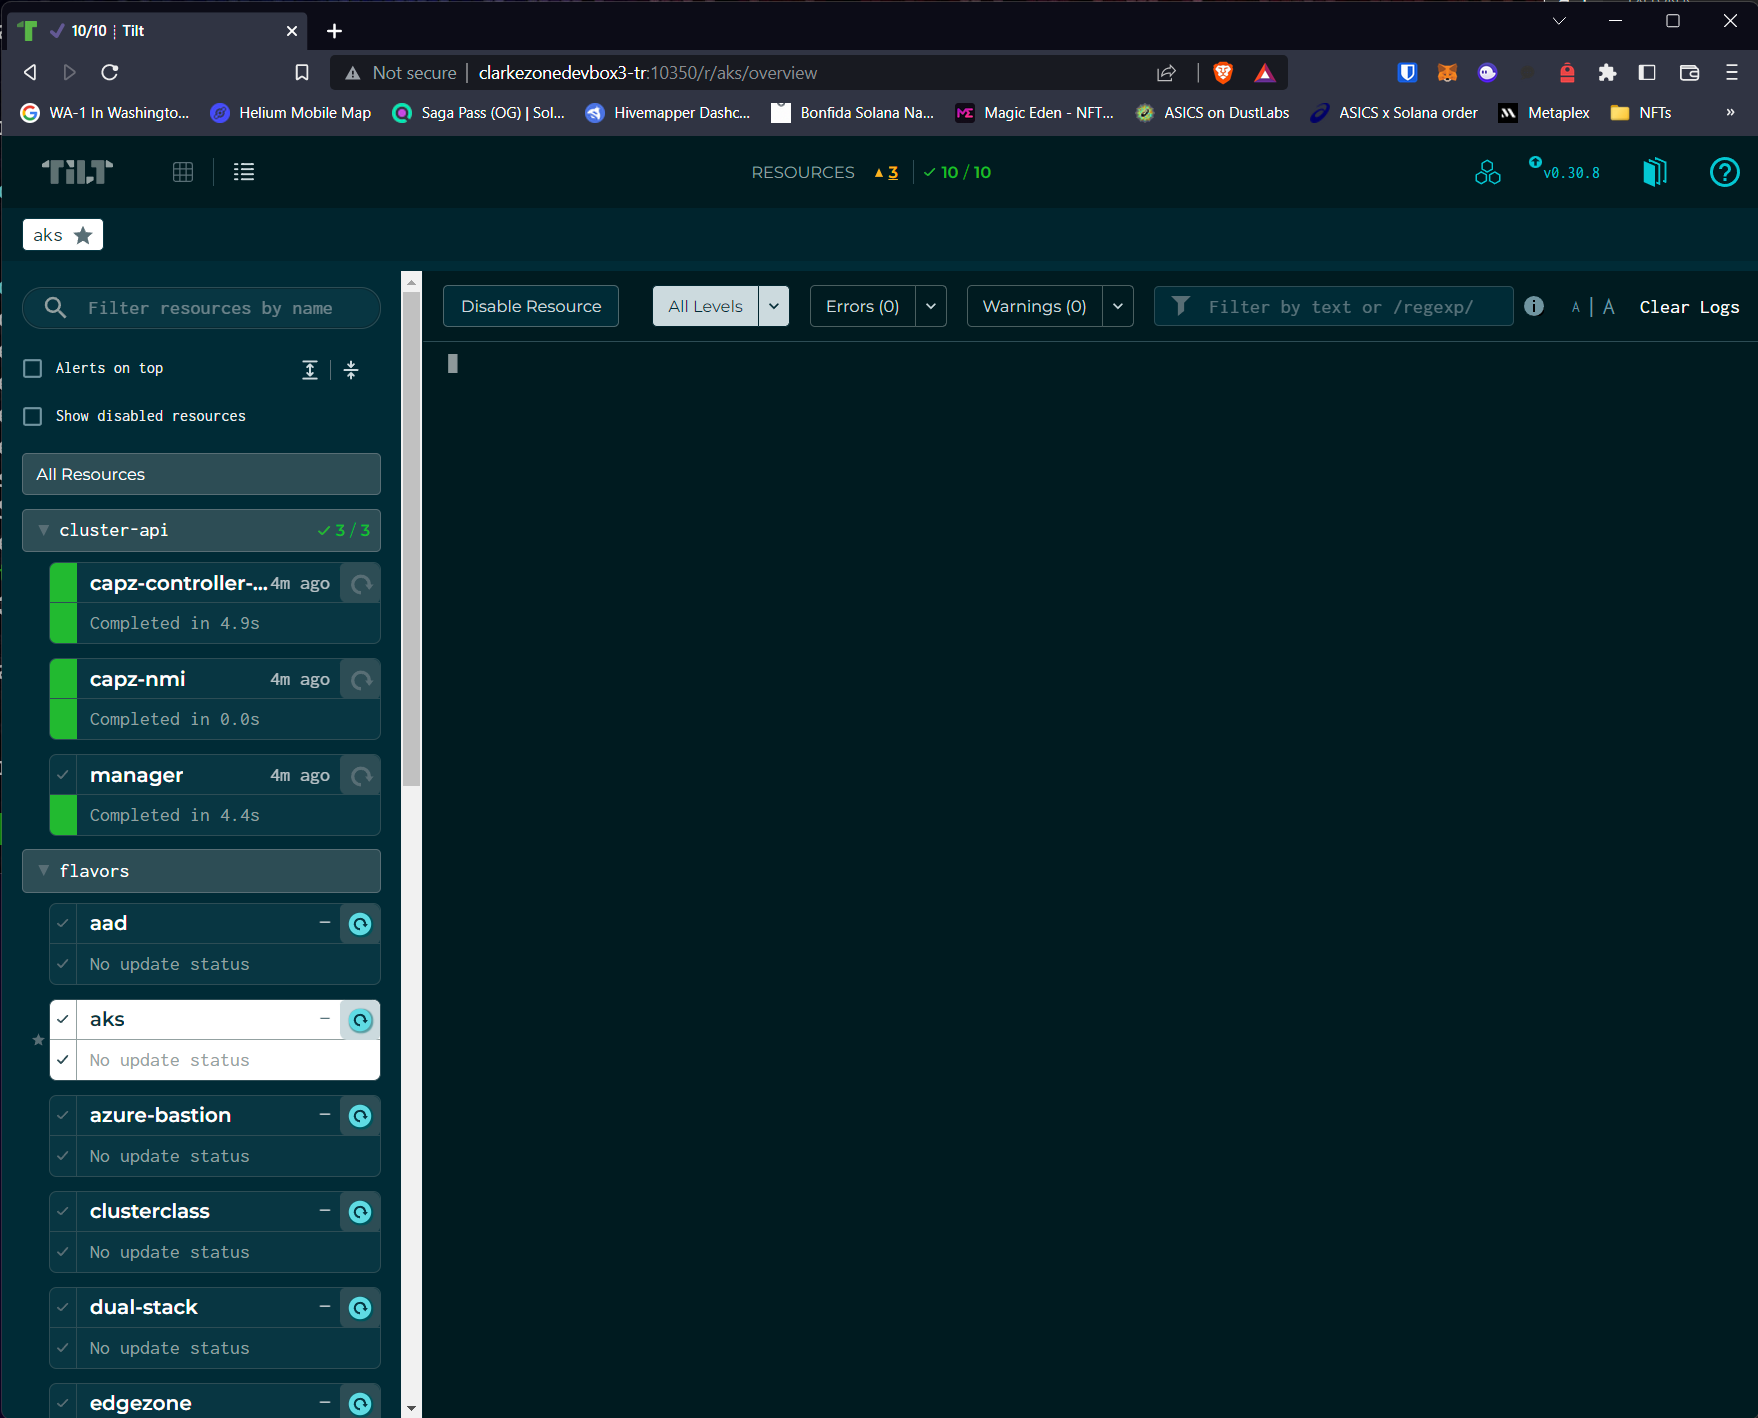
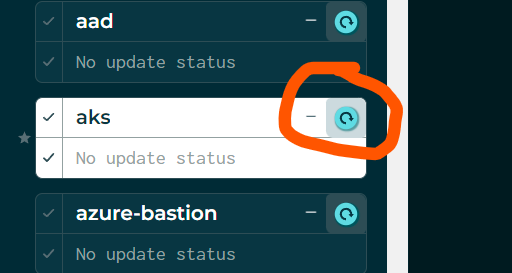
- Click on the AKS link which should take you to a detailed screen as follows showing a list of possible Azure resources that can be created:
![]()
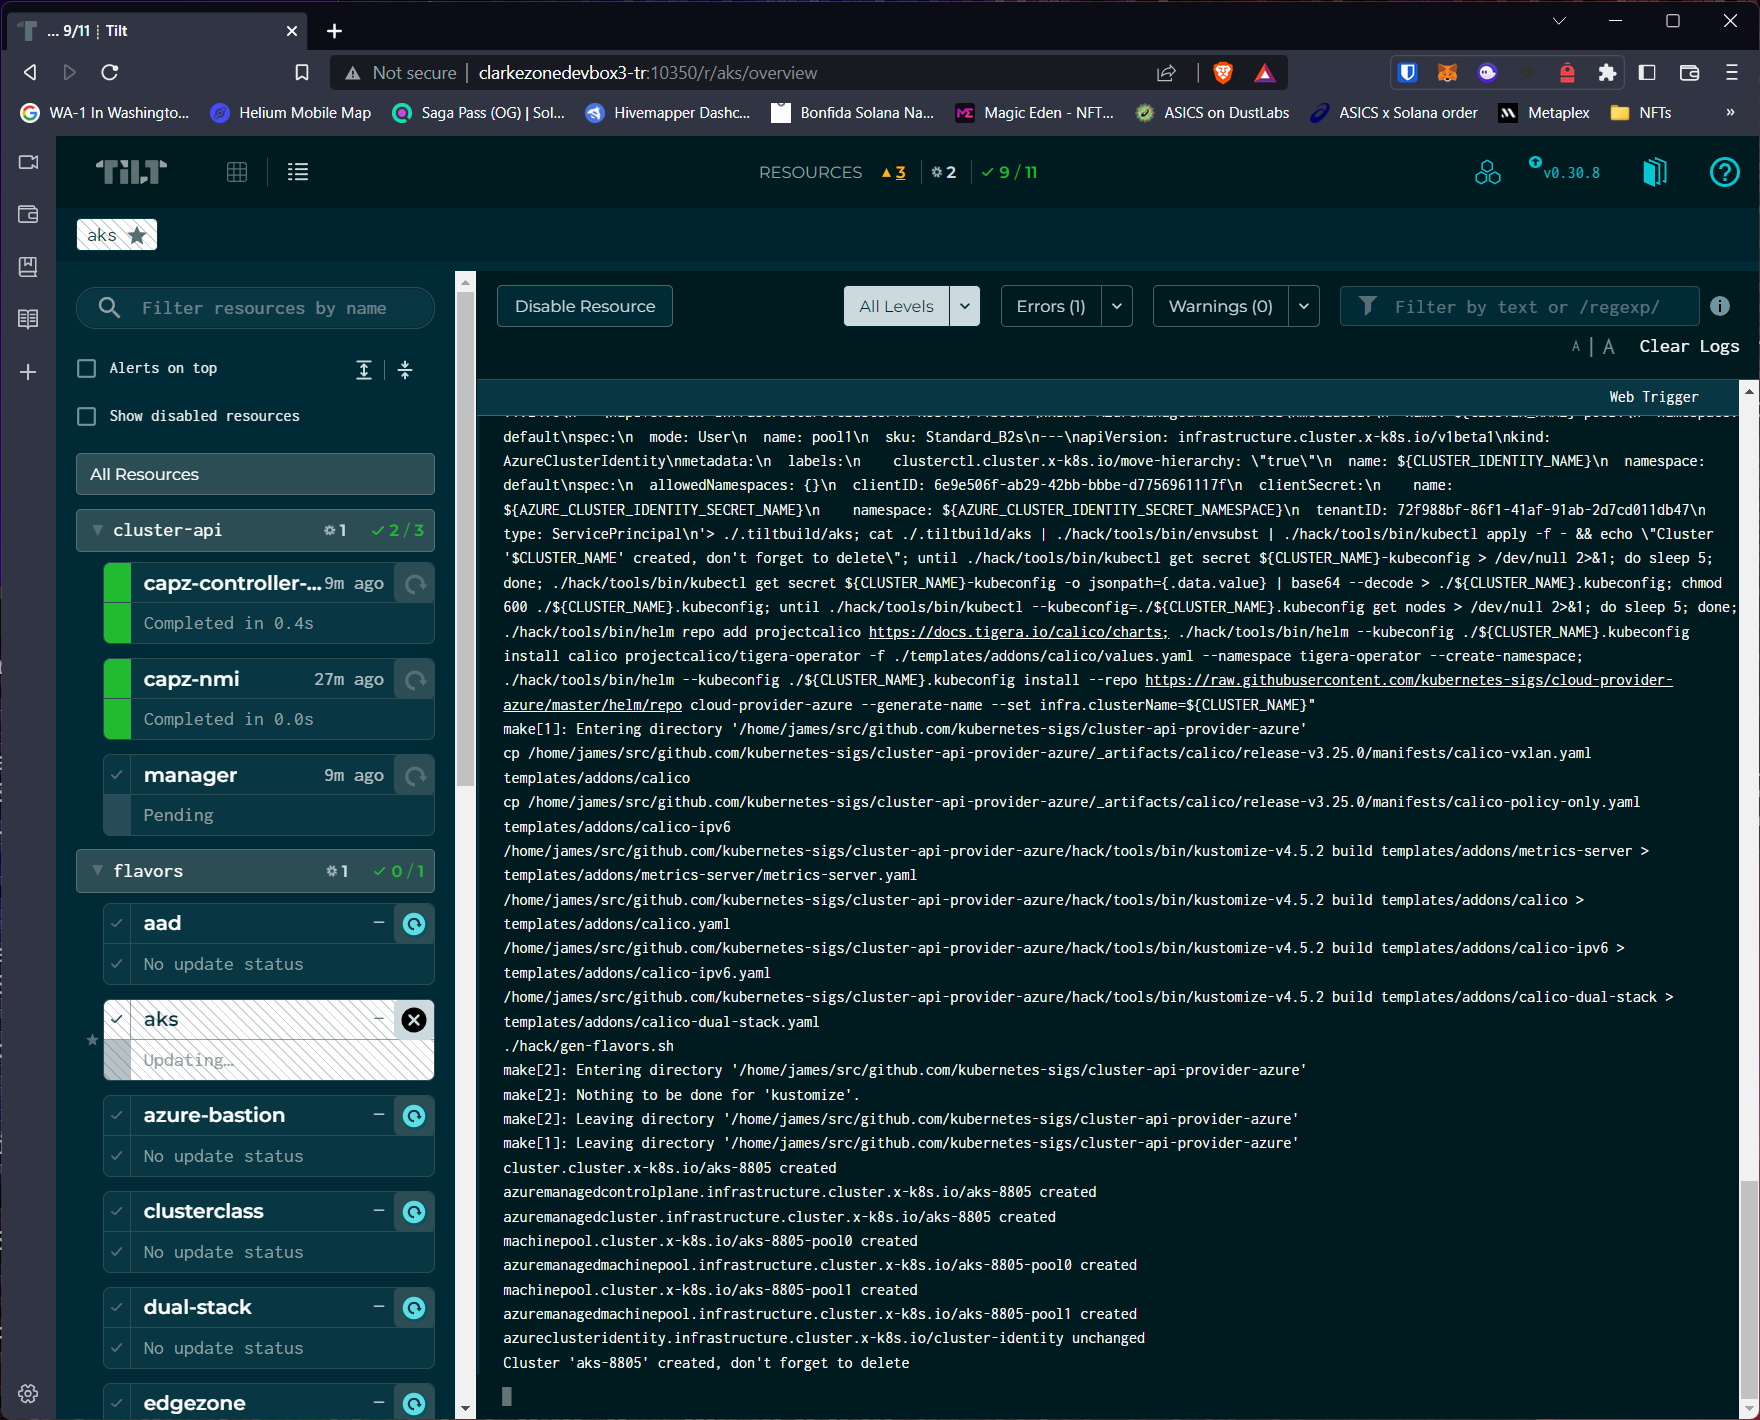
- Trigger an install of an AKS cluster by clicking on the refresh icon next to AKS. Result is a bunch of console spew showing up in the window:
![]()
If all went well, you should see the final line of output as something similar toCluster 'aks-20648' created, don't forget to delete. This is an important point. This step is creating an Azure AKS cluster in your subscription. If you forget to delete it, you will be paying for it. At the end of this exercise, make sure you’ve deleted any resources you don’t intend to keep around.![]() At this point, the management resource representing an AKS cluster has been created in the kind management cluster and, under the covers, CAPZ will go about provisioning the AKS cluster into your subscription. The resource type that represents a cluster is
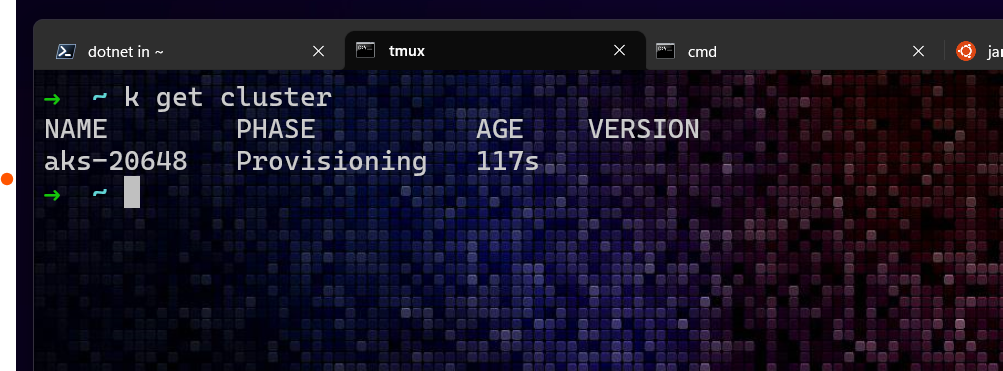
At this point, the management resource representing an AKS cluster has been created in the kind management cluster and, under the covers, CAPZ will go about provisioning the AKS cluster into your subscription. The resource type that represents a cluster is clusterand you can query the management cluster for it viakubectl:1
kubectl get cluster
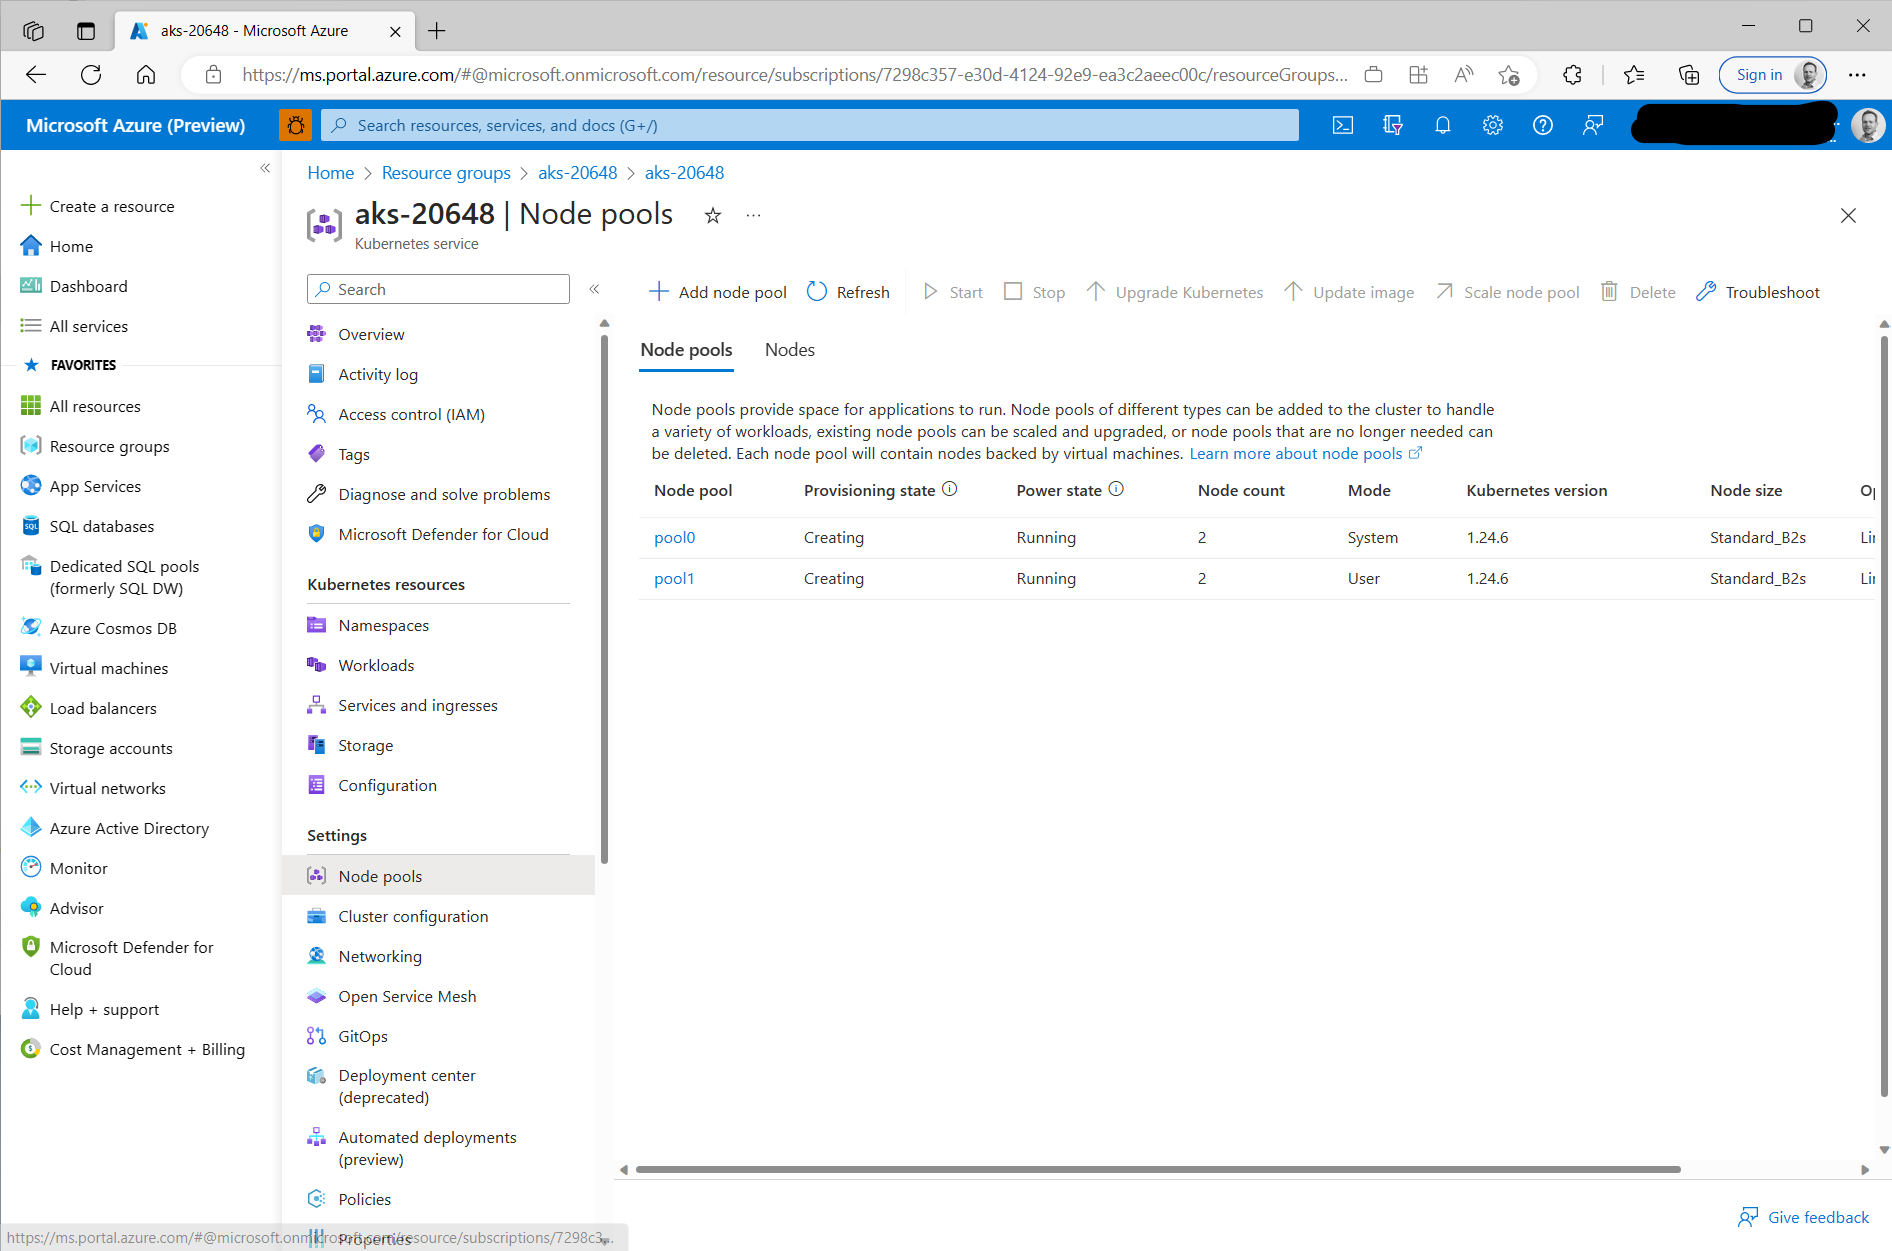
![]() Once provisioning gets beyond a certain point the resource will also show up in the Azure portal:
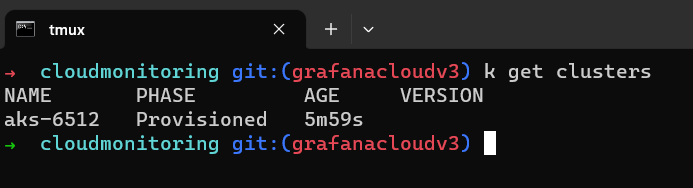
Once provisioning gets beyond a certain point the resource will also show up in the Azure portal: ![]() Finally, once the cluster provisioning has completed, you should see the status update on the management cluster of
Finally, once the cluster provisioning has completed, you should see the status update on the management cluster of kubectl get clusters![]() Now, you can grab the
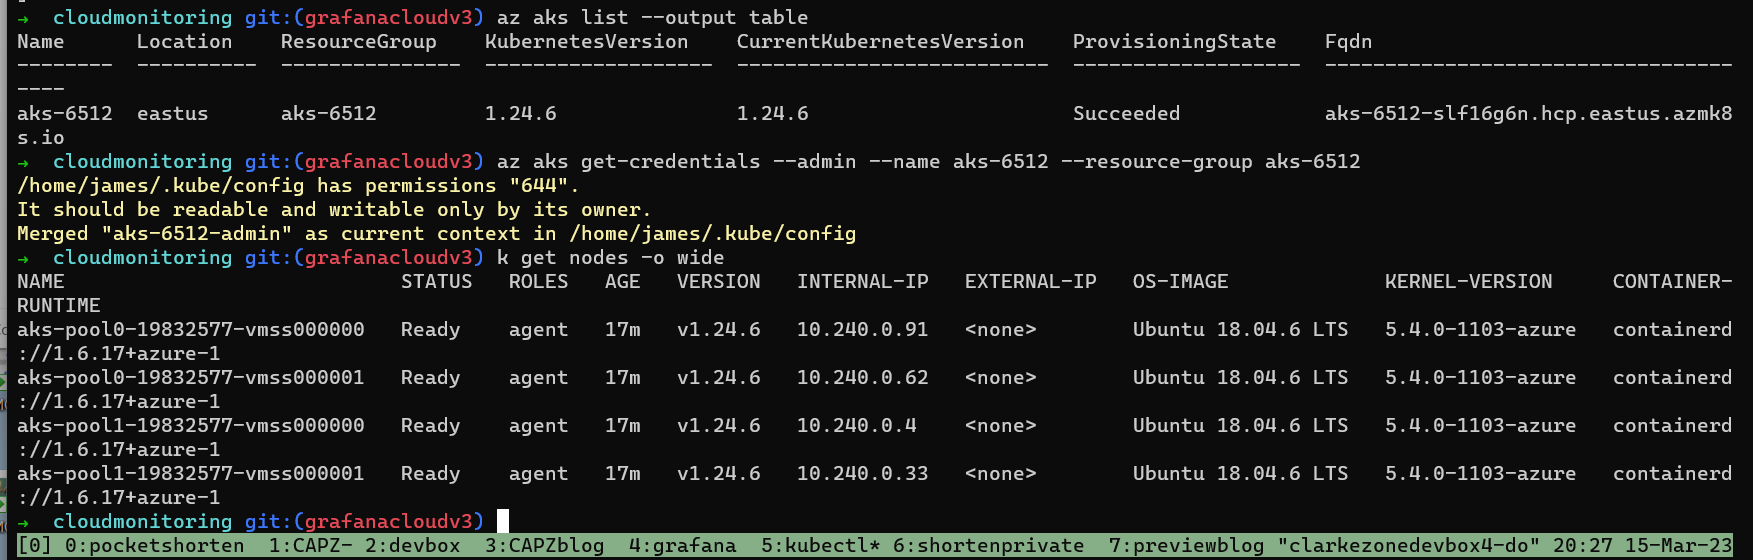
Now, you can grab the kubeconfigand talk to your shiny new AKS cluster humming away in an Azure datacenter:1 2
az aks list --output table az aks get-credentials --admin --name aks-6512 --resource-group aks-6512
![]()
Delete AKS and management clusters
Feel free to kick the tires of your new AKS cluster. Maybe you could try deploying a test workload. Once you are done, lets clean up. We’ll first use the management cluster to delete the AKS cluster running in Azure and then clean up the management cluster itself removing it from your dev machine.
For this task, we’ll use the CLI. As I mentioned above, Tilt is providing a web front end manipulating resources in the CAPZ control cluster running in kind. Even though we created the cluster using Tilt, we are going to delete the cluster by manipulating Kubernetes objects in the control cluster directly from kubectl:
kubectl delete cluster aks-20648This will take a while to complete. When it does so, make sure you confirm in the Azure Portal that the cluster is gone.- Delete the service principal:
1
2
  az ad sp list --output table --all --filter "displayname eq 'capztest'"
  az ad sp delete --id=<REPLACE-WITH-SP-ID">
- Tear down management cluster
make kind-reset
Summary and next steps
Congratulations, you made it! In this tutorial you learned:
- What the Cluster API (CAPI) and Cluster API for Azure (CAPZ) are.
- How to install CAPZ on a management cluster from source and run it locally on your devbox.
- Use declarative Kubernetes manifests to manipulate resources in Azure.
In the next post in this series, I’ll show you how to customize recipes for creating Azure resources, install CAPZ into an existing Kubernetes homelab and manipulate Azure resources through via kubectl. Thanks for reading, please do drop me a line on Twitter or Mastodon if you have any questions or comments.
Big thanks to Jack Francis and David Tesar for their kind and patient reviews.